Return to Homepage ...
Domain Name Search
    
Need Live Assistance? Click Here ...

Site Secured by Thawte
 Home > Support Center > SSH Secure Shell
.
.
Company Information Contact Us Support Documentation Order Hosting Now ... Click Here!
SUPPORT TOPICS


Secure Shell (SSH)
What is SSH?

What is Secure Shell and how do I use it?

Overview of SSH


When you SSH to your domain, you are controlling it using the operating system of the server. Any commands you enter are run on the server (not your local PC) and operate according to the command parameters on the server.

Secure Shell (SSH) provides a command line interface that lets you run commands to modify the contents of your web site. It encrypts all the data sent and received, providing a high level of security.


Secure Shell (SSH) Clients
PuTTY
SecureCRT
Getting started with SSH

Using SSH with UNIX

Using UNIX

The following is a list of UNIX commands that we found to be helpful when modifying web sites on the server. Most UNIX commands have many options and parameters which are not listed here. For more complete information on using UNIX commands, you can refer to the online manual by typing man [command] at the UNIX prompt, where "[command]" represents the command you would like more information about. Other UNIX help commands you can type are [command] -? and [command] --help.

Note: When something is specified in brackets, such as [command] or [filename], it is used to indicate that you must input your desired information here. Do NOT include brackets in your command.

Note 2 : Only use lower-case letters. UNIX is case sensitive.

Navigating in UNIX

pwd Shows the full path of the current directory
ls Lists all the files in the current directory
ls -al Lists all files and information
ls –alr Lists all files and information in all sub-directories
ls -alr | more Same as ls –alr, pausing when screen becomes full
ls -alr > filename.txt Same as ls –alr, outputs the results to a file
ls -al /home/usr/bob/ Lists files and information for /home/usr/bob
ls *.html Lists all files ending with .html
cd [directory name] Changes to a new directory
cd .. Changes to directory above current one

Moving, Copying and Deleting Files

mv [old filename] [new filename] Move/rename a file
cp [filename] [new filename] Copies a file
rm [filename] Deletes a file
rm * Deletes all files in current directory
rm *.html Deletes all files ending in .html

Creating, Moving, Copying and Deleting Directories

mkdir [directory name] Creates a new directory
ls -d */ Lists all directories within current directory
cp -r [directory] [new directory] Copies a directory and all files/directories in it
rmdir [directory name] Removes a directory if it is empty
rm -r [directory name] Removes a directory and all files in it

Searching Files and Directories

find . -name [filename] -print Searches for a file starting with current directory
grep [text] [filename] Searches for text within a file

File and Directory Permissions

There are three levels of file permissions; read, write, and execute.  In addition, there are three groups to which you can assign permissions; file owner, user group, and everyone. 

The command chmod followed by three numbers is used to change permissions.  The first number is the permission for the owner, the second for the group and the third for everyone.  Here are how the levels of permission translate:

0 = --- No permission
1 = --x Execute only
2 = -w- Write only
3 = -wx Write and execute
4 = r-- Read only
5 = r-x Read and execute
6 = rw- Read and write
7 = rwx Read, write and execute

It is preferred that the group always have permission of 0.  This prevents other users on the server from browsing files via FTP.  Here are the most common file permissions used:

chmod 604 [filename] Minimum permissions for HTML file
chmod 705 [directory name] Minimum permissions for directories
chmod 755 [filename] Minimum permissions for scripts & programs
chmod 606 [filename] Permissions for data files used by scripts
chmod 703 [directory name] Write-only permissions for public FTP uploading
Creating an RSA Identity

Using SSH

We have changed our policy for SSH to better our security on all the servers. All clients have been added an SSH icon in their Domain Manager. Via this addition you will be able to enable SSH access to your account.

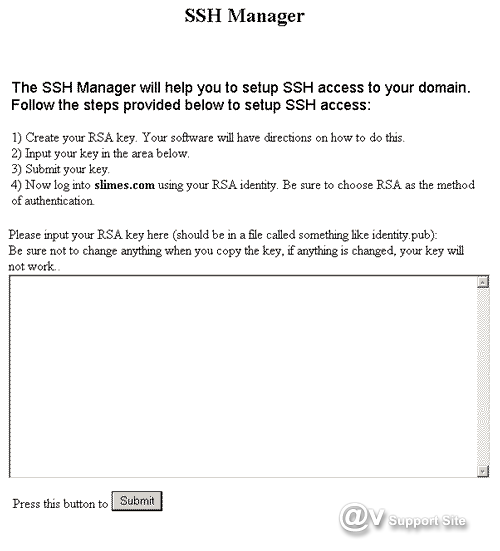
To setup an RSA key follow the instructions below.

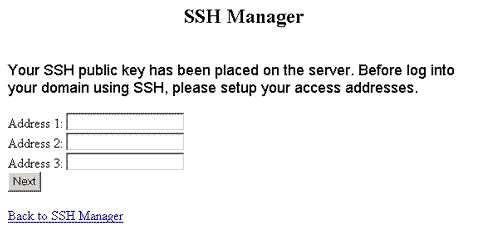
Please note that you do not have to have a RSA to gain access. You can also leave the RSA field blank, and it will take you to a second screen that will allow you to put in where you are connecting from. (by IP address) If you have a static IP, just enter the IP address that you connect to the net with and hit submit. If you have a dial-up and you have a different IP every time that you connect, just put in the Class B that you connect with. Lets say that your IP address right now is 65.123.43.23.

IP --> 65.123.43.23
Class A --> 65.*.*.*
Class B --> 65.123.*.*

Class A addresses will not be allowed due to the number of IPs that can be connected from. So to put in your Class B you would put "65.123.*.*" in the field. But now lets say that you connect 3 different times and get 3 different Class B's, just put them all in.
Overview of RSA Authentication

RSA authentication uses a public-private key pair to authenticate and log in to an SSH1 Server. It offers a higher level of authentication security than password authentication by requiring both the private key and the passphrase that protects the private key in order to complete authentication.

Setting up RSA Authentication for a SecureCRT session is a multi-step process. Identity Files are created with the RSA Key Generation Wizard. The identity file is defined for global or session-specific use in the Advanced SSH Options dialog. Then the public key is added to the authorized_keys file located on the SSH server.

Note: Only SSH1 supports RSA authentication.

Creating Identity Files

To create an RSA identity file:

Open SecureCRT and goto Options.

1. In the Connect dialog, select the SSH1 session with which you would like to use the identity files.

2. Open the Session Options dialog and in the Connection category, click the Advanced button.

When Advanded is clicked, an alert box is activated and states "Changes on the Advanced SSH Options dialog will not take effect until the next time you connect using this session."

3. Select the General tab and click on the Create Identity File button in the Identity Filename section.

4. Follow the instructions in the RSA Key Generation Wizard to create your identity files. Once your public-private key pair has been generated by the RSA Key Generation Wizard, you will be prompted for the path and filename in which your private key will be stored. Be sure to specify a secure location for this file such that you are the only individual with access to it. The public key will be placed in a file with the same basename as the private key file, but with an extension of .pub.

Once you have created the RSA key you will need to open the file in a text editor and then copy and paste it into the field that is provided in the first screen of the SSH section in the Domain Manager.

Congratulations, you have created your RSA public and private key pair.

 
. Copyright © 1997 AtlantaVirtual.com, Inc. | All Rights Reserved

Secured by Thawte